Sunday, June 16, 2013

Stenciling on a scrapbook cover--learn from my mistake!

The album I bought for my trip to Michigan had a plain blue cover.


I decided to try to stencil a title on it, so I cut out the letters from vinyl using my Cricut.


Then I used some fabric paint and a sponge dabber (What are these things called?) to apply 2 coats of fabric paint.


I thought I should let the paint dry completely before I took the stencil off, but I was a little anxious, and started pulling the stencil off a bit before that.  As it turns out, I think maybe I should have pulled it off when the paint was still wet.  The paint was stuck to the stencil on the edges.  This picture shows the worst part. 


 I was able to touch it up a bit with a paint brush, but I don't think this paint is going to stay on in the long run.  

See how it kind of rolls up at the edges of the letters?


Has anyone ever tried this successfully?  Did you use a different kind of paint or remove the stencil earlier?  I was pleased that the paint didn't leak under the stencil (I think the smudge in the M is from my fingers as I pulled the stencil off, not from leakage under the stencil.) so I have hopes of making this work in the future.  Any tips from readers would be greatly appreciated :)


Despite the less-than-perfect results, I did cut vinyl with my Cricut to make the stencil, so I'm entering this in the vinyl challenge at Fantabulous Cricut Challenge Blog.

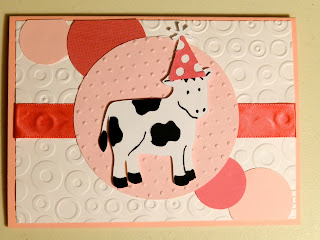
Have a moo-velous birthday!

My friend Kristie is married to a farmer and we got into a habit several years ago of giving each other cow-related birthday cards.  It occurred to me this afternoon that her birthday is in 2 days, so I needed to get to work!


I used Animal Kingdom for the cow and Create a Critter for the hat.  The white paper was run through the Cuttlebug Spots and Dots folder and the pink circle was run through Swiss Dots.  My ribbon across the middle is recycled from a shopping bag handle.

This card will be entered in the following challenges:
Pamela's World of Scrap--I used sketch C5 from the sketchbook.
Really Reasonable Ribbon #74 I'm seeing dots & ribbon

Last page of my Michigan trip album

I finished scrapping the last layout of my trip to Michigan and had the backside of a page leftover, and PLENTY of pictures!


I used Campin' Critters for the sign at the bottom and 50 States to cut out Michigan.

This layout will be entered in the following challenges:
Pamela's World of Scrap--I used sketch number 177 from the sketchbook.
Paper Playtime #12 Anything Goes
Simon Says Stamp Challenge--Transport (My husband is by his bike in the upper right picture.)
CAS-ual Fridays--travel

Michigan album title page

I had saved the title page of my album of our Michigan vacation for last, since I knew I would want to use leftover pictures on it in some way.  There were LOTS of leftover pictures!  My husband gets a little camera-happy and I need to get better at narrowing them down before I print them.  I could probably make a whole other album with the leftovers!


I even used pictures to cut out the title using the Plantin Schoolbook cartridge.

This page will be entered in the following challenges:
Pamela's World of Scrap--I used sketch #180 from the sketchbook.
Paper Playtime--#12 Anything Goes
Simon Says Stamp Challenge--Transport  (This album is of a trip during which we took boats, a car, and our bikes.)
CAS-ual Fridays--Travel

Saturday, June 15, 2013

Sunset layout

Last summer my husband and I vacationed in Michigan.  On our last night there, we took a rowboat out on the small lake at our campground.  We took along a bottle of wine we bought locally and the fudge we had purchased on Mackinac Island a few days earlier.  We got some beautiful sunset pictures.  I was taking forever choosing a layout (I've found I always like layouts better when I find them online rather than when I slap the pictures down myself.)  Today, I happened to find a layout via Pinterest that had the same number of photos I was working with, and in the same direction.  That had to be the layout for me!  And, even better, the layout was part of a current challenge!

Here is what I came up with:


As I was taping down the last items on the second page, I realized that I had focused a little too much on each individual page and not the 2-page spread.  The line of black stars across the middle doesn't line up at all.  Oh, well.  I'm not going to tear it apart now.  At least the pages coordinate.


The black circles were cut with a punch and embossed using the Tiny Stars folder by The Paper Studio.  Here is a close-up of the embossing on the black circles:

The sentiment on the left hand page ("Recipe for an Enchanted Evening") came from a tourist booklet I picked up in Michigan.  The black stars are from Doodlecharms.  The "Under the Stars" sign on the right hand page is from Campin' Critters.

This layout will be entered in the following challenges:
Pamela's World of Scrap--layout #237b (I flipped the left and right pages.)
Desert Island Craft Challenge--#56 diecut/punch, dry embossing, sentiment
Paper Playtime--#12 Everything Goes
CAS-ual Fridays--CFC105 Mapquest/Travel theme